june 1 week 7 final assignment:
complete the google form that was emailed to your school account. That's it! Have a great summer! Email me if you want to keep in touch! Take care, Mrs. Kubu
may 25 week 6
Your choice of either Stay At Home Travel Photography or The Top Photographer Finale and Create Your Own assignment was due May 24th. Please, be sure to share your assignment with me for your grade. Thanks!
This week you have 2 assignments to choose from. Check them both out, then decide which is doable and most interesting to you. As before, the assignment will be due on Sunday at 11:59pm. Email me or join me during office hours if you have any questions or concerns.
***FYI: Next week will be your final assignment for this class, a short reflection.
It will be assigned Monday June 1st and due Friday June 5th.
choose 1 to complete for this week's assignment!
may 18 week 5
Your choice of either The Getty Challenge or The Top Photographer assignment was due May 17th. Please, be sure to share your assignment with me for your grade. Thanks!
This week you have 2 assignments to choose from. Check them both out, then decide which is doable and most interesting to you. As before, the assignment will be due on Sunday at 11:59pm. Email me or join me during office hours if you have any questions or concerns.
This week you have 2 assignments to choose from. Check them both out, then decide which is doable and most interesting to you. As before, the assignment will be due on Sunday at 11:59pm. Email me or join me during office hours if you have any questions or concerns.
Please Choose one of the two options below to complete for this week's assignment
may 11 week 4
Your Land/Cityscape assignment was due 5/10. Please make sure you published your assignment so I can grade it. Thanks!
Starting this week, I will give you two assignments to choose from. You need to think about which one interests you most and is most doable under the circumstances. As before, the assignment will be due on Sunday at 11:59pm. Email me or join me during office hours if you have any questions or concerns.
Starting this week, I will give you two assignments to choose from. You need to think about which one interests you most and is most doable under the circumstances. As before, the assignment will be due on Sunday at 11:59pm. Email me or join me during office hours if you have any questions or concerns.
Please Choose one of the two options below to complete for this week's assignment
may 4 week 3
Your Time Lapse Photography assignment was due 5/3. Please be sure to publish your 14 photos showing change in chronological order with your written reflection.
Your Land/Cityscape assignment will be due 5/10. Please, remember, you do NOT have to leave your home to complete this post. Here's a hint: for landscape, think NATURE and for cityscape, think MANMADE. You may use previous photos for this assignment! NO TRAVEL NEEDED! Just make sure you have a focal point and that the photo is quality and/or edited to be the best it can possibly be!
Email me or drop in on one of my office hour times if you have any questions or concerns. Take care!
april 27 week 2
Your What if?... assignment was due 4/26. I'm looking forward to checking out your blogs and seeing your amazing photos! I hope you had fun with this assignment.
Your Time Lapse Photography assignment is due 5/3. Don't forget to take one photo a day! Fourteen photos will be due (in chronological order) with a reflection.
You may begin shooting your photos for land/cityscape whenever you get a chance. They will be due 5/10.
Email me or drop in on one of my office hour times if you have any questions or concerns. Take care!
remote instruction begins!
april 20 where did we leave off? ...
I have been hard at work trying to come up with some great assignments for our remote instruction. I hope you find them enjoyable and a chance to use your creativity. It will be similar to our normal class where a lesson is introduced, you will research the theme, you will shoot photos, and then you will upload your work to your blog. I know some of you have access to devices and the internet whenever you need it, but others do not. I think flexibility and ingenuity are skills that we all will be utilizing during this unprecedented time. I look forward to spending the end of the year with you and seeing what you create!
Each lesson will be posted on Monday no later than 8am. We'll follow up on Wednesday with any clarifications or questions of your progress. Lessons will be due by 11:59 Sunday night.
For now, let's focus on completing one lesson a week. We will start with our Time Lapse Photography and What if? assignments we left off with.
Due: 5/3/2020 Time Lapse Photography (see below) here's a hint: set an alarm or reminder on your phone to shoot one photo each day of something that will gradually change over the next 14 days. START TODAY!
Due: 4/26/2020 What if?...(see below) here's a hint: be creative, don't hold back, just don't be reckless!
Due: 5/10/2020 Landscape/Cityscape (see below) here's a hint: for landscape, think NATURE and for cityscape, think MANMADE. You may use previous photos for this assignment! NO TRAVEL NEEDED! Just make sure you have a focal point and that the photo is quality and/or edited to be the best it can possibly be!
*There will be no final exam for this class!
MARCH 13 CORONAVIRUS 3 WEEK BREAK ASSIGNMENTS below
CORONAVIRUS 3 WEEK BREAK MARCH 16-APRIL 5 2020
Here are the recommended photography assignments to complete over our unexpected break. If not completed during break, you will need to complete them after break. It is understood that not everyone has access to devices, wifi, etc. But, do what you can with what you have during this time and you will benefit later on.
I posted the assignments below. You had an opportunity in class 3/13/20 to print this doc if you do not have internet access at home.
mark hirsch and time lapse photography -during break
DAY 1
Time-lapse photography is a cinematography technique whereby the frequency at which film frames are captured (aka the frame rate) is much lower than that which will be used to play the sequence back.
In your case, you are going to be shooting one photo a day for the next 2 weeks.
Let's do some research:
Mark Hirsch and That Tree
Time Lapse Photography
1. Start a new post and title it Mark Hirsch and Time Lapse Photography
2. You need to choose which project you will complete for this post. Start your blog post by explaining if you are choosing to follow Mark Hirsch and That Tree or if you are choosing to focus on a subject progressively changing over time and explain why.
3. If you choose Mark Hirsch and That Tree:
Over the next 2 weeks, you need to take 1 picture a day of the same plant (something that will change as we transition to spring, ex: a tree, a bush, a flower, grass). Be creative with your angles, shadows, time of day/night for lighting, depth of field, editing, what else is included in the picture, etc). Make sure whatever you choose to shoot is easily accessible (at your house) Be diligent in taking 1 photo a day! Set a reminder on your phone!
OR
If you choose Time Lapse Photography
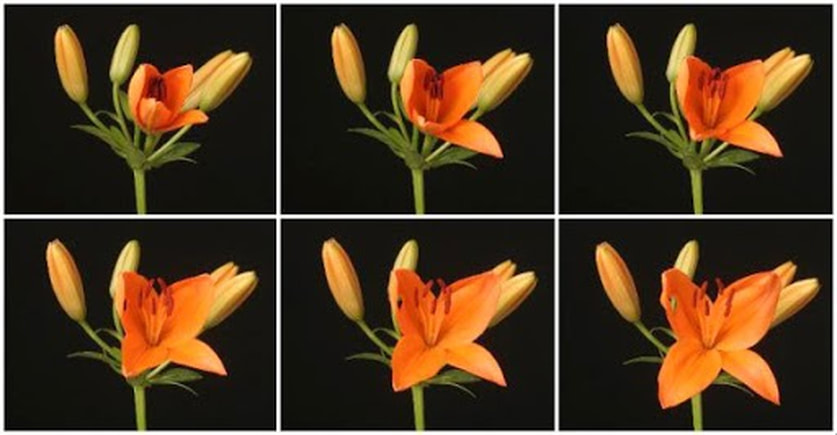
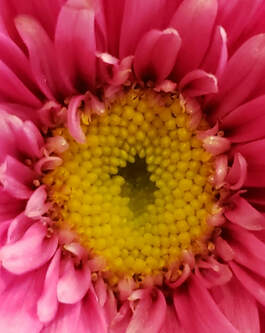
Choose a subject that will change over the next 2 weeks (food rotting, flowers growing, beard growing, etc.) Diligently take 1 photo a day of your subject from the same angle using the same lighting, background, etc. There should not be a lot of other information in the photo so that your subject is the focal point and the progressive change is evident. SEE FLOWER IMAGE ABOVE. Be diligent in taking 1 photo a day! Set a reminder on your phone!
4. Write your plan for your subject matter. What will you focus on? What do you anticipate will happen as it progressively changes? Or, what are some angles you can utilize or lighting? Etc.
For example: I am choosing to follow Mark Hirsch and That Tree. I plan on shooting a daffodil plant outside my house for 14 days. During that time, I will attempt to capture it in various weather and lighting like the golden hour or blue hour. I will also try to utilize worm's eye view and bird's eye view. Maybe I can get my dog in one of the photographs. I also hope that the plant will be in full bloom and then maybe wilting toward the end of the 14 days because I'd like to try to get some macro shots of it in full bloom and then when it wilts.
*Suggestion: Set a reminder or an alarm on your device to make sure you fulfill the one photo a day requirement.
DAY 2 (Complete this section 14 days later)
1. Open your Mark Hirsch and Time Lapse Photography post.
2. Upload all 14 of your time lapse photos IN CHRONOLOGICAL ORDER!
3. Number each photo with the appropriate day.
4. Copy, paste and answer the following:
Did the subject you chose work well for this project?
Did it change like you had anticipated? If not, why?
If you could give advice to someone doing this assignment in the future, what would it be?
5. Publish your post. Preview it to make sure it is visible for me to grade. Thanks!
Time-lapse photography is a cinematography technique whereby the frequency at which film frames are captured (aka the frame rate) is much lower than that which will be used to play the sequence back.
In your case, you are going to be shooting one photo a day for the next 2 weeks.
Let's do some research:
Mark Hirsch and That Tree
Time Lapse Photography
1. Start a new post and title it Mark Hirsch and Time Lapse Photography
2. You need to choose which project you will complete for this post. Start your blog post by explaining if you are choosing to follow Mark Hirsch and That Tree or if you are choosing to focus on a subject progressively changing over time and explain why.
3. If you choose Mark Hirsch and That Tree:
Over the next 2 weeks, you need to take 1 picture a day of the same plant (something that will change as we transition to spring, ex: a tree, a bush, a flower, grass). Be creative with your angles, shadows, time of day/night for lighting, depth of field, editing, what else is included in the picture, etc). Make sure whatever you choose to shoot is easily accessible (at your house) Be diligent in taking 1 photo a day! Set a reminder on your phone!
OR
If you choose Time Lapse Photography
Choose a subject that will change over the next 2 weeks (food rotting, flowers growing, beard growing, etc.) Diligently take 1 photo a day of your subject from the same angle using the same lighting, background, etc. There should not be a lot of other information in the photo so that your subject is the focal point and the progressive change is evident. SEE FLOWER IMAGE ABOVE. Be diligent in taking 1 photo a day! Set a reminder on your phone!
4. Write your plan for your subject matter. What will you focus on? What do you anticipate will happen as it progressively changes? Or, what are some angles you can utilize or lighting? Etc.
For example: I am choosing to follow Mark Hirsch and That Tree. I plan on shooting a daffodil plant outside my house for 14 days. During that time, I will attempt to capture it in various weather and lighting like the golden hour or blue hour. I will also try to utilize worm's eye view and bird's eye view. Maybe I can get my dog in one of the photographs. I also hope that the plant will be in full bloom and then maybe wilting toward the end of the 14 days because I'd like to try to get some macro shots of it in full bloom and then when it wilts.
*Suggestion: Set a reminder or an alarm on your device to make sure you fulfill the one photo a day requirement.
DAY 2 (Complete this section 14 days later)
1. Open your Mark Hirsch and Time Lapse Photography post.
2. Upload all 14 of your time lapse photos IN CHRONOLOGICAL ORDER!
3. Number each photo with the appropriate day.
4. Copy, paste and answer the following:
Did the subject you chose work well for this project?
Did it change like you had anticipated? If not, why?
If you could give advice to someone doing this assignment in the future, what would it be?
5. Publish your post. Preview it to make sure it is visible for me to grade. Thanks!
what if...? -during break

DAY 1
1. Title a new post: What if...?
2. Your goal is to experiment and make discoveries during this assignment. Be creative with your ideas. They need to be plausible/doable. Be fearless. Don't hold back. Just don't be reckless. ****I recommend checking out Jordi Koalitic (see above images) to get some great ideas!
Copy, paste and complete the following prompts:
List 10 scenarios:
Ex: What if...I shoot photos using a flash in a completely dark room?
1. What if...
2. What if...
3. What if...
4. What if...
5. What if...
6. What if...
7. What if...
8. What if...
9. What if...
10. What if...
Keep in mind the Principles of Composition and techniques you have used in class so far (shadow/light, alternative angles, depth of field, framing, rule of thirds, leading lines, abstract, macro, action, etc.). Don't forget to test different camera modes. And, make sure you have fun doing it!
This assignment is an outside of class assignment.
DAY 2
1. Open your What if...? post.
2. Upload each of your 10 What if...? photos and match them up with your 10 scenarios.
3. Reflect on this assignment. Comment on your photos regarding each of the following:
This was my favorite What if...? photo because....
This was my least favorite What if...? photo because...
This was the most fun photo to shoot because...
This was the most challenging photo to shoot because...
4. Publish your post. Double check that it appears correctly on your blog so I can grade it.
landscape & cityscape photography-during break
DAY 1
1. Start a new post and title it Landscape and Cityscape Photography.
2. Copy, paste and answer the following questions:
What is the difference between Landscape and Cityscape photography?
What is panorama/panoramic photography?
What is the Golden Hour?
What is the Blue Hour?
2. Research Landscape Photography. List 5 helpful hints when shooting landscape photography. Include your source.
3. Upload a landscape photo. Explain why you chose it and what you think the photographer did to get the image. Describe time of day/night, angle of shot, weather, panoramic mode, leading lines, focal point, rule of thirds, etc.
4. Research Cityscape Photography. List 5 helpful hints when shooting cityscape photography. Include your source.
5. Upload a cityscape photo. Explain why you chose it and what you think the photographer did to get the image. Describe time of day/night, angle of shot, weather, panoramic mode, leading lines, focal point, rule of thirds, etc.
6. Just to clarify: YOU DO NOT NEED TO TRAVEL FOR THIS ASSIGNMENT! SHOOT YOUR PHOTOS WHEREVER YOU ARE NOW. ***Photos shot previously will be acceptable for submission for this assignment. Still explain your photo in your post.
For Landscape Think: NATURE
For Cityscape Think: MANMADE
For both, your photograph needs to have a focal point. It shouldn't be a flat corn field. It needs to have a foreground, middle ground and background. Use the following to help you write your plan for Landscape/Cityscape Photography. Copy, paste and answer the following questions:
LANDSCAPE
What will be your focal point?
What time of day?
From what angle?
What would be your choice of weather?
Are you going to use panoramic mode? Why or why not?
Where/How could you utilize leading lines/rule of thirds/blue hour/golden hour/etc?
CITYSCAPE
What will be your focal point?
What time of day?
From what angle?
What would be your choice of weather?
Are you going to use panoramic mode? Why or why not?
Where/How could you utilize leading lines/rule of thirds/blue hour/golden hour/etc?
DAY 2
1. Open your Landscape & Cityscape post and edit it.
2. Upload your very best Landscape photo. Then, copy, paste and answer the following questions:
What was your focal point?
What time of day?
From what angle?
What was the weather?
Did you use panoramic mode? Why or why not?
Where/How did you utilize leading lines/rule of thirds/blue hour/golden hour/etc?
3. Next, upload your very best Cityscape photo. Then, copy, paste and answer the following questions:
What was your focal point?
What time of day?
From what angle?
What was the weather?
Did you use panoramic mode? Why or why not?
Where/How did you utilize leading lines/rule of thirds/blue hour/golden hour/etc?
4. Publish your post. Preview it to make sure it all appears so I can grade it.
march 13 finish action photography post
1. Edit your Action Photography post and upload your best 3 shots from your homework (remember: 3 different subjects!).
2. Copy, paste and answer the following in your blog:
My favorite action photo I shot was......because....
The most fun part about action photography for me is...because....
Would you consider shooting action photos in the future? Why or why not?
3. Publish your post before you leave today!
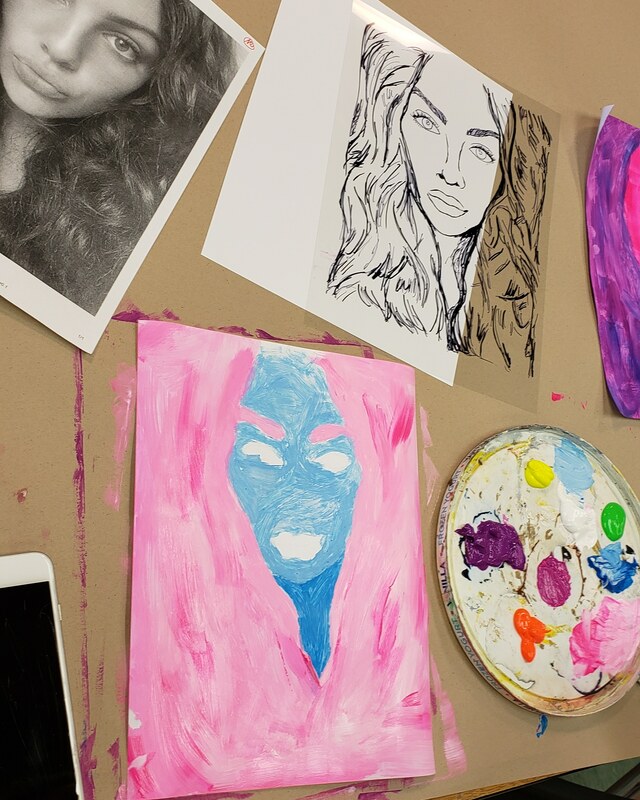
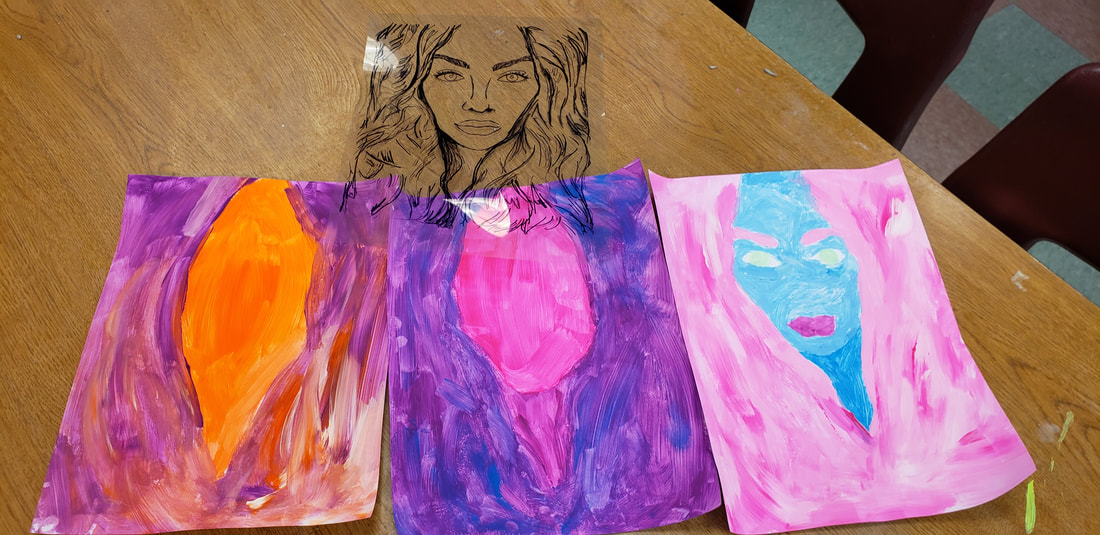
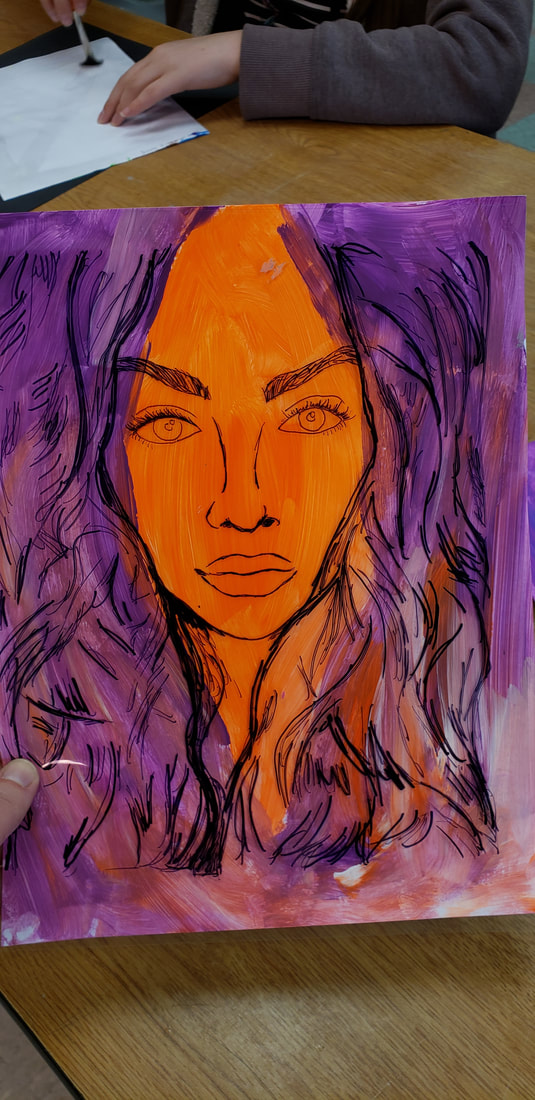
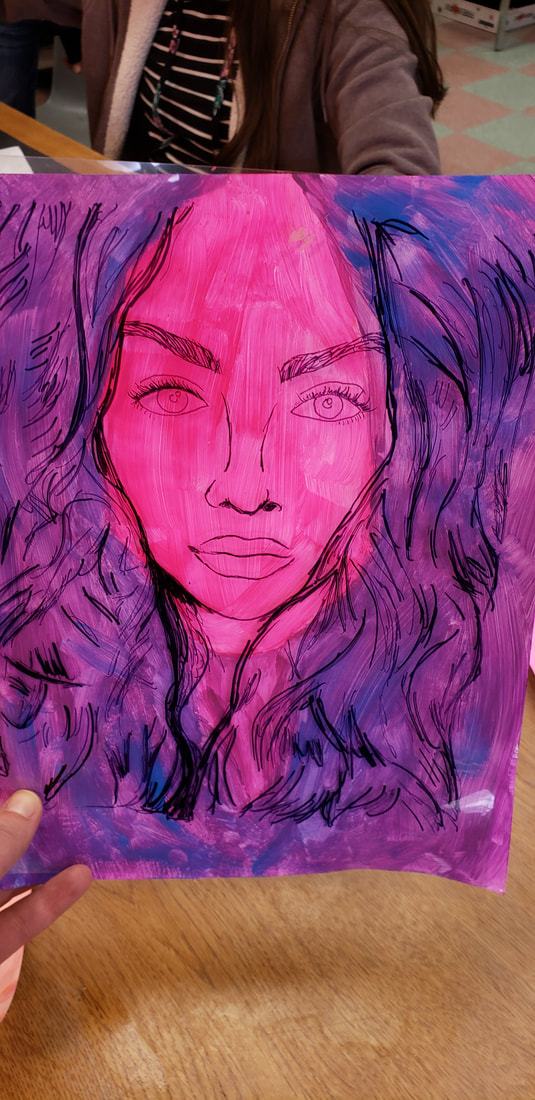
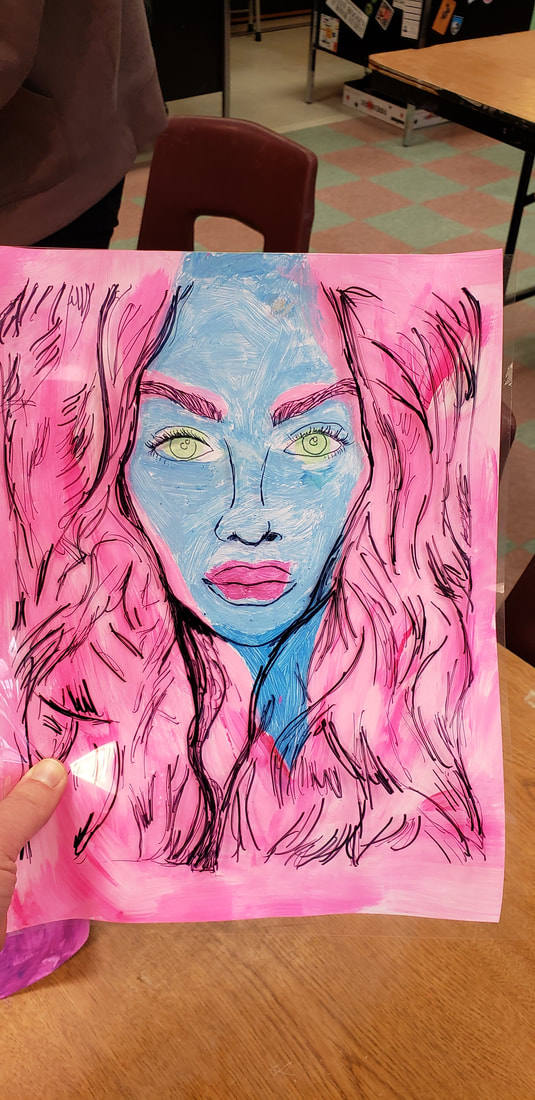
4. Create a new post and title it Graphic Self Portrait. Upload your original self portrait picture and your final self portrait that was traced, painted, and glued. Publish your post before you leave today.
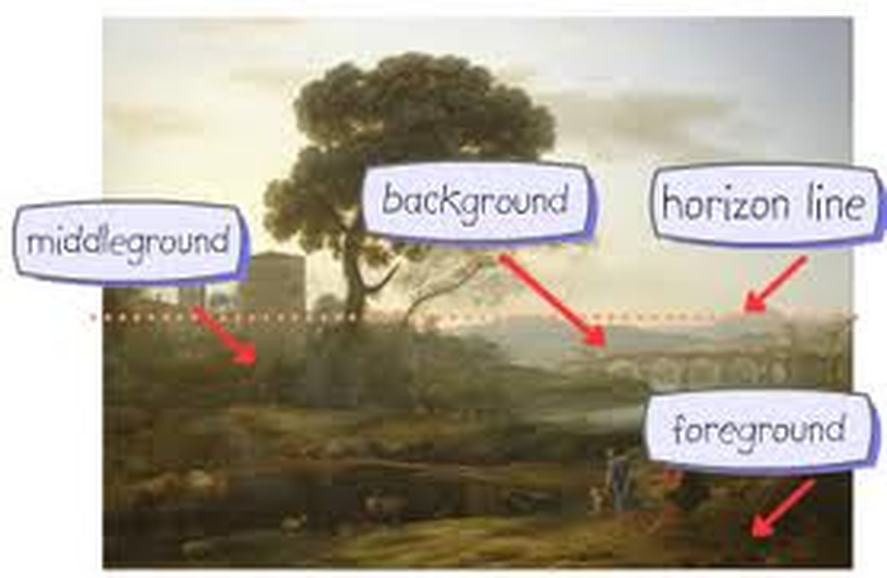
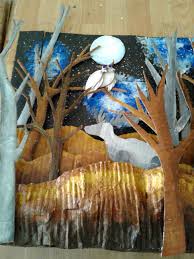
5. Create a new post and title it Foreground/Middle Ground/Background. Upload an image of your 3D collage. In your post, explain the following:
In my background, you can see...
In my middle ground, you can see...
In my foreground, you can see...
Publish your post before you leave today.
*Today is the last day to submit artwork to the Congressional Art Competition. If you're interested, see me for more information!
** Today is the last day to submit your Panorama and Graphic Self Portrait posts for credit. Please tell me in class or email me that you published it so I can update your grade. Thanks!
2. Copy, paste and answer the following in your blog:
My favorite action photo I shot was......because....
The most fun part about action photography for me is...because....
Would you consider shooting action photos in the future? Why or why not?
3. Publish your post before you leave today!
4. Create a new post and title it Graphic Self Portrait. Upload your original self portrait picture and your final self portrait that was traced, painted, and glued. Publish your post before you leave today.
5. Create a new post and title it Foreground/Middle Ground/Background. Upload an image of your 3D collage. In your post, explain the following:
In my background, you can see...
In my middle ground, you can see...
In my foreground, you can see...
Publish your post before you leave today.
*Today is the last day to submit artwork to the Congressional Art Competition. If you're interested, see me for more information!
** Today is the last day to submit your Panorama and Graphic Self Portrait posts for credit. Please tell me in class or email me that you published it so I can update your grade. Thanks!
march 11-12 foreground/middle ground/background
3D collage
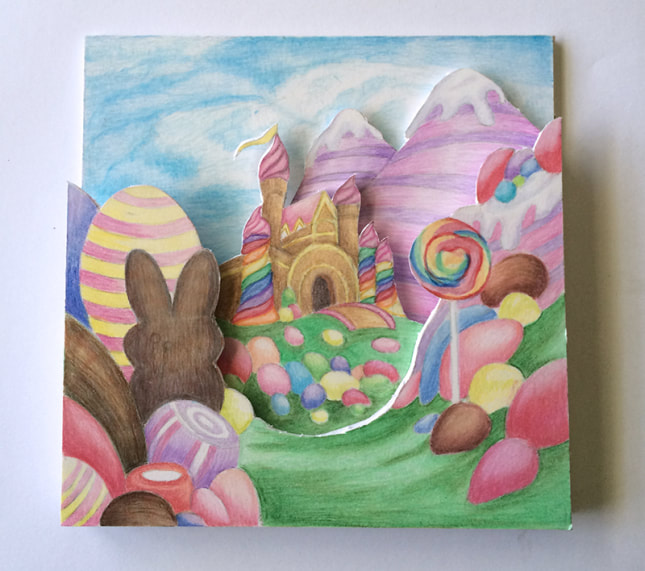
Definitions:
Foreground is the part of a view that is nearest to the observer, especially in a picture or photograph.
Middle ground the middle distance of a painting or photograph.
Background the area or scenery behind the main object of contemplation, especially when perceived as a framework for it.
Application:
1. Get a piece of cardboard and write your name on the back of it.
2. Use magazine images to create an environment incorporating things in the foreground, middle ground and background. Be mindful of the size of each image to make sure it looks believably close, far away, even further away.
3. Cut the images out carefully. You'll have access to scissors and x-acto knives, glue sticks, rubber cement and Elmer's glue. Use foam core behind the images and attach them to the cardboard environment to give it depth (the third dimension). Don't be afraid to go "outside" of the rectangle.
We'll work on these for a couple class periods.
march 10 Playing with panorama continued

REMINDER-YOUR HOMEWORK IS TO SHOOT ACTIONS SHOTS OF AT LEAST 3 SUBJECTS BY FRIDAY!
You are going to shoot 3 types of panoramic shots today.
You get to choose a partner. Your partner will shoot photos of you and you will shoot photos of him/her.
You may choose from this Article which features 7 Panoramic Photo Ideas. Or you may choose to research panoramic photo ideas on your own.
Here is a video on Cloning for your use as well.
1. When you are finished shooting your 3 different types of panoramic shots with your partner, upload them to your Playing with Panorama post.
2. For each photo, explain which type it is and what you did to capture the shot. Explain any challenges you encountered and how you overcame them. Explain which was your favorite and why. Use terms we have learned in class. Use proper grammar and punctuation.
3. Publish before you leave class.
*Wednesday will be the last day that Abstract Photography will be accepted. You need to email me or tell me in class that you have updated it so I can update your grade.
MARCH 9 MORE ACTION AND PLAYING WITH PANORAMA
REMINDER-YOUR HOMEWORK IS TO SHOOT ACTIONS SHOTS OF AT LEAST 3 SUBJECTS BY FRIDAY!
1. Upload your very best action photo from our photo shoot in the gym last week to your Action Photography post.
2. Copy and paste and answer the following prompts in your blog:
One of the strengths in my action photo was....
One of the challenges for my action photo was...
In the future, I would overcome the above challenge by ...
3. Publish your post before you leave. We'll continue this post on Friday with your shots from your homework.
4. Start a new post and title it Playing with Panorama.
5. A Panorama is any wide-angle view or representation of a physical space.
6. Research panorama and list 5 helpful hints when shooting panoramic photos.
7. Research how to shoot a panorama using your device. List helpful steps and/or put a link to a helpful website in Your post.
8. Check your camera for Panoramic Mode/Pano Mode under your camera settings. If you do not have this mode, you need to work with a partner who does. You may choose to play around with panorama individually or with a partner.
9. Shoot panoramic photos for practice in our room or in the dome outside our classroom door.
10. Be ready to shoot more photos using this technique tomorrow. You may want to bring a jacket in case the weather allows for us to go outside. No props necessary.
Dave Black
march 5 Action PHotography
1. Class discussion of article: A Times Photographer's Journey Home to the Winter Olympics.
-His obsession with capturing the perfect moment at the Olympics at times rivals the obsession of the athletes themselves.
-Planning and patience may be the foundation, but once the event begins, instinct takes over. There is a purely meditative aspect to being a great sports photographer and a feeling of being solely in the moment. Anticipation is critical for capturing the moments that happen so fast.
-“It’s really being able to see what’s going to happen before it happens,” Mr. Lee said. “If you wait until you see it with your own eyes, many times it’s too late.”
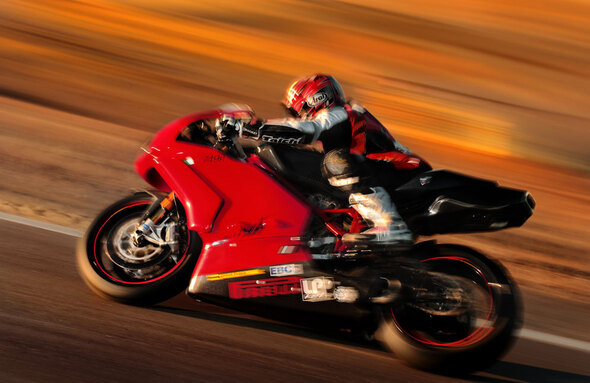
2. Start a new post and title it Action Photography.
3. Choose one of Chang W. Lee's Winter Olympics photos from the article and save and upload it to your blog.
4. Copy, paste and answer the following in your blog:
Does the action photo show faces/emotion?
Does it show the ball/equipment being used?
Does it show people moving or do they just look like they are sitting/laying/standing around?
Does it have good lighting?
Is it cropped to help focus on the subject in motion?
Is it focused or is it very blurry? (For this project, some blur can be ok! Especially if it's the object in motion!)
Was the panning technique used?
5. Make a list of 5 things to keep in mind when shooting action photos by researching online. Copy and paste the website where you got your information or use a hyperlink.
Ex. Panning (moving camera with the subject during the exposure so the subject is in focus but the background is blurry) https://www.nikonusa.com/en/learn-and-explore/a/tips-and-techniques/10-tips-for-better-camera-panning.html
1.
2.
3.
4.
5.
Be ready to shoot some action photos! Tomorrow, we will be shooting photos of basketball players.
*Outside of class: You will need to shoot action photos from home as homework. Think of things that move, drip, wave, jump, crawl, fly, twirl, scratch, etc. Your photos need to have different subjects and you need a strong composition so, use the techniques we've learned in class (alternative angles, cropping, contrast, depth of field, leading lines, rule of thirds, etc). These photos will be due by Friday March 13.
-His obsession with capturing the perfect moment at the Olympics at times rivals the obsession of the athletes themselves.
-Planning and patience may be the foundation, but once the event begins, instinct takes over. There is a purely meditative aspect to being a great sports photographer and a feeling of being solely in the moment. Anticipation is critical for capturing the moments that happen so fast.
-“It’s really being able to see what’s going to happen before it happens,” Mr. Lee said. “If you wait until you see it with your own eyes, many times it’s too late.”
2. Start a new post and title it Action Photography.
3. Choose one of Chang W. Lee's Winter Olympics photos from the article and save and upload it to your blog.
4. Copy, paste and answer the following in your blog:
Does the action photo show faces/emotion?
Does it show the ball/equipment being used?
Does it show people moving or do they just look like they are sitting/laying/standing around?
Does it have good lighting?
Is it cropped to help focus on the subject in motion?
Is it focused or is it very blurry? (For this project, some blur can be ok! Especially if it's the object in motion!)
Was the panning technique used?
5. Make a list of 5 things to keep in mind when shooting action photos by researching online. Copy and paste the website where you got your information or use a hyperlink.
Ex. Panning (moving camera with the subject during the exposure so the subject is in focus but the background is blurry) https://www.nikonusa.com/en/learn-and-explore/a/tips-and-techniques/10-tips-for-better-camera-panning.html
1.
2.
3.
4.
5.
Be ready to shoot some action photos! Tomorrow, we will be shooting photos of basketball players.
*Outside of class: You will need to shoot action photos from home as homework. Think of things that move, drip, wave, jump, crawl, fly, twirl, scratch, etc. Your photos need to have different subjects and you need a strong composition so, use the techniques we've learned in class (alternative angles, cropping, contrast, depth of field, leading lines, rule of thirds, etc). These photos will be due by Friday March 13.
feb 28 finished abstract photography
and begin graphic self portrait
1. Choose your 2 favorite abstract photos from the experiments. One from the oil/water experiment and and one from your milk/food coloring experiment. Edit it as needed to make it a strong composition. Upload it to your Abstract Photography post.
2. Title your abstract photos. Be creative (and school appropriate).
3. Reflect on your abstract photos, one taken within our classroom and two from our experiments. Copy, paste and answer the following questions in your blog:
Which is your favorite photo and why?
What are some of our photography techniques we've learned that you used to capture the abstract photo?
What makes the composition strong?
Is abstract photography something you might pursue in the future?
4. Publish your post before you leave class today...
5. Then, begin your Graphic Self Portrait. Start by selecting a selfie that focuses on your head/neck/shoulders. The background shouldn't take up a lot of the photo, so crop it as needed.
6. Next, print your selfie so it takes up a full page of paper on the D8 printer.
7. Show Mrs. Kubu your paper to get it okayed and to get your transparency and your sharpie.
8. Finally, line up your paper underneath your transparency and begin to trace the lines you see (the outline of your body, your eyes, nose, mouth, ears, hair, clothing, etc.). Get the basics traced, then go back and trace the little details.
9. Remove the paper and double check the image on the transparency to see if you missed anything.
We'll paint the background next week!
feb 26-27 Snow days!


"Neighborhood"
by Meagan Kubu
feb 21-24 abstract photography
1. Class discussion: Abstract photography, sometimes called non-objective, experimental, conceptual or concrete photography, is a means of depicting a visual image that does not have an immediate association with the object world and that has been created through the use of photographic equipment, processes or materials. An abstract photograph may isolate a fragment of a natural scene in order to remove its inherent context from the viewer, it may be purposely staged to create a seemingly unreal appearance from real objects, or it may involve the use of color, light, shadow, texture, shape and/or form to convey a feeling, sensation or impression.
2. Start a new post and title it Abstract Photography.
3. Research abstract photographers. Choose an abstract photo taken by one of the abstract photographers. Upload the photo and say who shot the photo and the title of it.
4. Explain what makes this photo abstract. (Use the definition of abstract photography from above to help you answer this.)
5. Explain how you think the photographer captured the shot.
6. Explain why you chose this photo.
7. Research Abstract Photography Tips (try this website). List 5 helpful hints when shooting abstract photographs.
8. Your goal is to take one abstract photograph without leaving this room. Make the viewer (me) guess where/how you took the shot. Then, upload it to your Abstract Photography post.
9. Research these 2 experiments. You will be conducting them Tuesday in D9. So, make sure you know what you are doing!
Oil and Water Abstract Photos:
Milk and Food Coloring Abstract Photos:
***Feb 24 will be the last day to submit your Rule of Thirds, Alphabet, Quote and Macro posts for credit. Either tell me in class or email me what you have posted so I can update your grade. Thanks!
feb 20 macro continued
1. Use your knowledge from your research yesterday about Macro Photography and the props you brought to take Macro Photos.
2. Take as many photos as you can trying out different lighting, different backgrounds, different props, etc.
3. Try your best to get the most focused photo possible! This is imperative for your success for this assignment! Experiment! Discover! And have fun!
4. When you finish, upload your very best macro photo to your Macro Photography blog post from yesterday.
5. Explain how your photo is a great example of macro photography based on the following criteria:
-subject size
-background
-focus
-depth of field
-lighting
6. Publish your post before you leave.
feb 19 macro photography
1. Title this new post Macro Photography
Read the articles:
Macro Photography for Beginners Part 1
Macro Photography for Beginners Part 2
Here's How to Take Fantastic Macro Shots on Your iPhone
2. Using the articles as a source, define Macro Photography in your own words.
3. Using the articles , list 3 things to keep in mind when shooting macro photography.
4. Insects and flowers are often used. List 10 other subjects you want to explore using macro photography.
5. Upload one image of macro photography from the internet.
6. Explain why each of the following make it a good example of macro photography:
-subject size
-background
-focus
-depth of field
-lighting
*Be ready to shoot your macro photos Thursday. Bring a prop (think small!) and, if you have a macro specialty lens, bring it.
feb 18 Rule of thirds continued &
alphabet & quote catch up
1. Decide which 3 photos are your strongest based on the Rule of Thirds. Edit as needed. Upload them to your blog post Rule of Thirds.
3. Explain what your focal point is in each of the 3 photos. How did you use Rule of Thirds regarding placement of the focal point? Where does the viewer's eye travel after the focal point?
Publish your post before you leave today!
**If you did not finish the Alphabet Photos Blog and email/share your quote with me-TODAY'S THE DAY! Submit before you leave!
feb 13-14 alphabet photos and quote
1. Make sure you are all caught up before you leave today. Notify me of any updates you made to your posts from absences or incompletes. Today is the last day I'll accept DOF, Framing, Leading Lines!
2. Start a new post and title it Alphabet Photos.
3. Make sure your photos have been cropped so only the letter is visible/readable. Upload your Alphabet photos in ALPHABETICAL ORDER!
3. Research a quote from a song lyric/poem/literature/inspirational saying/etc. *It must be school appropriate. A sentence/phrase/stanza would be sufficient length. Make sure you find out who originally said/wrote/sang the quote.
4. You will be using your alphabet photos to spell out the quote on either a word doc or google doc. Whichever you prefer. The quote should take up majority of the doc. You may want to change orientation of the doc from portrait to landscape. At the bottom, type the name of the person who said/wrote/sang the quote. Use a font that goes well with the feel of the quote. You may need to enlarge or bold the name to make it stand out.
A few things I'm looking for:
*Appropriate Quote
*Sufficient Length
*Easily readable
*Flows well on document (portait vs landscape orientation has been considered)
*Fills the page (sizing and location of words have been considered)
*Credit given to person who said/wrote/sang the quote
This assignment will be due end of class tomorrow 2/14/20. You will need to email/share your doc with me to get these points.
**Shoot your Rule of Thirds photos for homework. It must not be shot in or around WHS. Be ready to upload your work on Tuesday.
FEB 12 RULE OF THIRDS
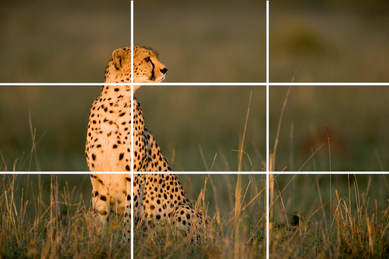
1. Start a new post and title it Rule of Thirds.
2. Watch the following videos:
https://www.youtube.com/watch?v=IpEuYp4_iSg
https://www.youtube.com/watch?v=A7wnhDKyBuM
3. In your blog, explain the Rule of Thirds. Use your own words! Explain why it is important, what tools you can use, what effect it has on your composition, etc.
4. Find 1 image that utilizes the Rule of Thirds and upload it to your blog.
5. Explain how the photographer used the Rule of Thirds regarding placement of the focal point to the grid lines.
6. Also, explain where your eye travels after it lands on the focal point.
7. Publish your post.
8. On your camera, go to settings and find "Guidelines" OR "Grid Lines" to access the Rule of Thirds grid. Apply it. If you can't find it, continue on to #8.
8. Get a transparency from me. Measure your camera screen. Cut your transparency to your camera screen dimensions. Measure and draw your Rule of Thirds lines on the transparency. Tape your transparency to your screen.
*This photo shoot will be homework. I don't want to see any photos shot in or around this building. Be ready to upload your photos to your blog on Tuesday 2/18/2020.
**Don't forget to be shooting your Alphabet photos. We will be using them Thursday 2/13!
feb 11 leading lines continued
1. We will go shoot photos using leading lines.
2. Upload your very best photo using leading lines in your Leading Lines post from yesterday. Please, crop, edit, add filters, etc to have the very best photographic composition.
3. Copy and paste the following questions into your blog and answer them:
What did you do to shoot your photo?
What did you use as your leading lines to draw the viewers attention to a focal point?
Who/What is your focal point?
Is your composition symmetrically balanced? What does this do to the composition?
4. Be sure to use proper grammar and punctuation. Publish your post before leaving today and double check to make sure you can view it on your blog!
**Don't forget to be shooting your Alphabet photos. We will be using them Thursday 2/13!
feb 10 leading lines
1. Start a new blog post and title it Leading Lines.
2. Research Leading Lines and IN YOUR OWN WORDS define the technique.
3. Explain why a photographer would use Leading Lines in a composition.
4. IN YOUR OWN WORDS define symmetry.
5. Explain how Leading Lines and Symmetry can be used together to create a strong composition.
6. Find an image that uses Leading Lines and upload it to your blog.
7. Describe what the photographer used to create the Leading Lines in the composition. Is the composition symmetrical?
8. Publish your post.
*Be ready to shoot photos using Leading Lines tomorrow.
**Don't forget to be shooting your Alphabet photos. We will be using them Thursday 2/13!
FEB 7 FRAMING CONTINUED
1. Review your framing assignment from yesterday.
2. Today will be your opportunity to shoot photos using the framing technique. Hopefully, you brought a prop. If not, you need to pair up and be a subject for your partner's photo. We'll go on a tour of the school and you'll need to get as many framing shots as possible. Stay with the group! How your class does on this school photography tour will decide the future of our out-of-classroom photo shoots.
3. Edit your photos so they are the best they can be!
4. Continue your Framing post from yesterday.
5. Insert your strongest photo that uses framing and upload it.
6. Write a paragraph reflecting on the photo by describing how you shot it, if you edited it and how the element you used as a frame enhances the composition.
4. Publish your post before you leave. It is due at the end of class.
*Extra time? Work on photographing your alphabet letters, cropping them and transferring them to the computer for next week.
feb 6 framing

Framing in photography refers to:
Today, you will research framing in photography.
1. Start a new post and title it Framing.
2. Find 1 image of framing from the internet and upload it to your blog.
3. Describe how the photographer used a "frame" in the image. What does the frame add to the composition?
4. Research more images and make a list of 25 areas/items/etc. that photographers used to frame their photos. Make sure your list is numbered by copying and pasting the numbers below:
List of items photographers used to frame photos:
1.
2.
3.
4.
5.
6.
7.
8.
9.
10.
11.
12.
13.
14.
15.
16.
17.
18.
19.
20.
21.
22.
23.
24.
25.
5. Start to think about what you can use to frame a photograph taken somewhere around the school. Tomorrow, we'll be working individually/with a partner/group to take "framed" photos. Have a prop ready to photograph or be ready to be a prop and have your photograph taken.
*Also, tomorrow will be the last day I accept any History of Photography, Shadow and Light, or Alternative Angles assignments. Please, notify me either in class or via email that you have updated it and published it so I can grade it. Thanks!
*Finished early? Begin the Alphabet Letter Photograph Cropping assignment below. We'll be using them soon!
- adding a foreground object into your scene that frames, or helps highlight your subject
- sometimes involve stepping back from your original composition and looking for elements to use as a frame
- the frame is there to set the scene, and draw the viewer into the image
Today, you will research framing in photography.
1. Start a new post and title it Framing.
2. Find 1 image of framing from the internet and upload it to your blog.
3. Describe how the photographer used a "frame" in the image. What does the frame add to the composition?
4. Research more images and make a list of 25 areas/items/etc. that photographers used to frame their photos. Make sure your list is numbered by copying and pasting the numbers below:
List of items photographers used to frame photos:
1.
2.
3.
4.
5.
6.
7.
8.
9.
10.
11.
12.
13.
14.
15.
16.
17.
18.
19.
20.
21.
22.
23.
24.
25.
5. Start to think about what you can use to frame a photograph taken somewhere around the school. Tomorrow, we'll be working individually/with a partner/group to take "framed" photos. Have a prop ready to photograph or be ready to be a prop and have your photograph taken.
*Also, tomorrow will be the last day I accept any History of Photography, Shadow and Light, or Alternative Angles assignments. Please, notify me either in class or via email that you have updated it and published it so I can grade it. Thanks!
*Finished early? Begin the Alphabet Letter Photograph Cropping assignment below. We'll be using them soon!

finished early?...
start shooting photos of letters of the alphabet.
consider shape, color, variety. look all around you!
Then, crop your photos so just the letter is showing.
transfer your 26 images to your computer so we can create our first project! Photo letter collage
feb 5 depth of field
1. Continue your Depth of Field post you started by editing it.
2. You are to shoot two photos. One needs to successfully use shallow depth of field and the other needs to successfully use deep depth of field. (See below.) You were to use the prop you brought and the same background in both photos. Just change the depth of field.
3. Insert your best 2 photos of DOF into your blog.
4. Label each photo appropriately with either shallow or deep DOF.
5. Write a paragraph explaining which of the two photos you prefer and why. Explain what you did to capture the two types of DOF (background, lighting, camera modes/aperture, etc). Explain how this technique might come in handy when taking photos in the future.
Publish your post before leaving class today. It is due at the end of the hour!
feb 4 depth of field
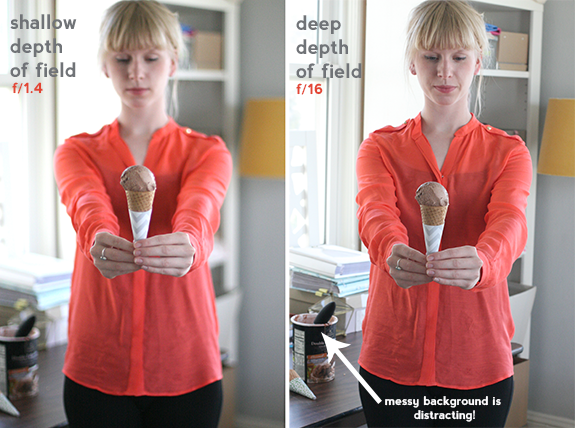
1. Create a new post in your blog and title it Depth of Field.
2. Research the following and post what you find in your blog. Be sure to site your sources!
-What is Depth of Field?
-What is aperture and what does it have to do with Depth of Field?
-What is shallow Depth of Field? Are there other acceptable terms than 'shallow'?
-What is deep Depth of Field? Are there other acceptable terms than 'deep'?
-What can you do with your camera to create shallow or deep DOF? *Hint-it's different for digital cameras and smartphones. If you're not sure how yours works, google it!
3. Select 1 image of shallow depth of field and 1 image of deep depth of field from the internet and post them on your blog.
4. Label them Shallow DOF and Deep DOF.
5. Be ready to shoot photos of Shallow and Deep DOF on Thursday. YOU NEED TO BRING A PROP. Small toys are fun to photograph, stuffed animals, keys, makeup, etc. You will be working in a group of 2 or 3. We'll have fabric and lights to setup a background.
FEB 3 ALTERNATIVE ANGLES CONTINUED
1. Edit your Alternative Angles post. Add your photos below the research you conducted last week.
2. Select your best 4 photos, one each of birds eye view, straight on, worms eye view and tilted. You may need to edit the photo by cropping or brightening, etc. Make sure your focus is on your prop and then angle of the photo. Upload your photos to your post.
3. Label each photo with the angle.
4. Include a paragraph about your favorite of your 4 successful photos. Explain why it's your favorite. Explain how you shot the image, if you edited it, etc. What does the angle say about the image. Read into it like a psychiatrist.
Be sure to publish your post! Double check that it appears by viewing your blog! Due end of class today!
jan 31 alternative angles

1. Create a new post and title it Alternative Angles.
2. Research: Post some facts that you researched in your blog. Be sure to site your sources (include the website from which you found the information.)
3. Find 4 images from the internet each using a different alternative angle.
-from above/birds eye view
-from below/worms eye view
-straight on/eye level
-tilted
4. Below each image, explain how you think the photographer created each unique angle.
5. Does this say anything about the image? Does it change how you, as the audience, view the image?
On Monday, be ready to shoot photographs from these angles. You need to bring a prop to class (toy, sunglasses, shoe, etc.)
jan 30 shadows and light continued
1. Open your blog and edit your Shadow and Light post. (By editing it, you'll be adding to what's already there.)
2. Look at the photos you took using shadow and light. When considering which are the best images, think about the following things:
-Is there good contrast? (light vs dark)
-Is there a strong sense of light direction?
-Is it a unique subject? Is it interesting to an outside viewer?
-Is it clear, not blurry/pixelated?
-Is there a strong focal point, not a lot of other information in the photo?
If you can answer YES to each of the above, then you have a good shadow and light photo. If you answer no, you might be able to edit and/or crop your photo to achieve a good shadow and light photo. Some suggestions would be to change the contrast setting or maybe crop the photo to get rid of other distracting information. Let me know if you are wondering about other fixes to help create the best photo possible.
3. Insert your very best photo from the shoot yesterday into your blog below your research.
4. Include a paragraph explaining what you did as a photographer to get the shot (light position, angle, used a prop or hand gesture, what you used as a background, etc.). A paragraph for this class is considered 3-5 complete sentences, using proper grammar and spelling. Be sure you publish your post! Due end of class today!
5. If you finish early, you're welcome to view other student's blogs to see their Shadow and Light posts. If you choose to leave a comment on their blog, stay positive, uplifting and remember that these are public.
jan 29 shadows and light
1. Title your new post: Shadows and Light
2. Research Shadows and Light and their use in photography. Some things to consider are:
-Is there good contrast? (light vs dark)
-Is there a strong sense of light direction?
-Is it a unique subject? Is it interesting to an outside viewer?
-Is it clear, not blurry/pixelated?
-Is there a strong focal point, not a lot of other information in the photo?
3. Post 2 images from the internet that represent the use of shadows and light. (Remember you can't just copy and paste images into your blog, you need to save them and insert them!)
4. Then, explain what you think the photographer did to create the images:
What light source was used?
What made the shadow?
What surface is the shadow on?
*Use complete sentences and proper grammar. Don't forget to re-read and spell check before you publish.
Tomorrow you will have a chance in class to create your own images using shadow and light. You will be randomly assigned a partner, but you each must create your own image! You may want to bring a prop to help you capture a great photograph. If you don't use a prop, think of a hand gesture, a figure's gesture, a shadow puppet, etc. that you can use. A phone with a flashlight would be helpful too. I'll provide some backgrounds for you to use if you'd like. If it's sunny, we can create images using the sun too.
jan 28 The history of photography continued
Just like yesterday, watch the videos and answer the questions below in THE SAME blog post you started yesterday.
1. Open your blog post The History of Photography and select EDIT.
2. Copy and paste the NEW questions below into your blog.
3. Type your answer to each question.
4. Preview your post to make sure all your work is visible.
5. Publish your post to make it public so I can grade it.
*This is due at the end of class. Email me if you have any questions.
Access the videos at this website: https://www.eastman.org/photographic-processes-video-series
Video 7 - The Platinum Print
21. What year was the platinum print invented?
22.Listen to how the process works. Describe the process in your own
words.
Video 8 - The Pigment Processes
23.After watching the video, explain to me something that you thought
was interesting.
Video 9 - The Woodburytype
24.Who invented this process, and when?
Video 10 - The Gelatin Silver Process - Mass Marketable Film
25. Fill in the blank:
The gelatin silver print is a ___________ process rather than a ________
process.
26.When was the first Kodak camera invented, and by who?
27.What other type of photography was created from the silver gelatin
process?
Video 11 - Color Photography
28. Black and white film was dye sensitized in order to create a color pho-
tograph. What three colors were made into negatives in the early begin-
nings of color photography?
29. Subtractive color uses three other colors. Which three?
Video 12 - Digital Photography
30. Who is the inventor of the digital camera?
31. What is the some major differences between digital and
analog/film photography?
jan 27 the history of photography
Watch the videos and answer the questions below in a new blog post.
1. Title your new blog post The History of Photography.
2. Copy and paste the questions below into your blog.
3. Type your answer to each question.
4. Preview your post to make sure all your work it visible.
5. Publish your post to make it public so I can grade it.
*This is due at the end of class. Email me if you have any questions.
Access the videos at this website: https://www.eastman.org/photographic-processes-video-series
Video 1 - Before Photography
1. What does the term “photography” in Greek mean?
2. How are images of silhouettes created (tracing of a shadow)? (What is the name of the device in the video?)
3. What does “camera obscura” mean?
4.What types of materials/chemicals did they begin to experiment with in order to record the image?
Video 2 - The Daguerrotype
5.What was so significant about the invention of photography?
6.Who made the earliest known photograph of all time?
7.What does “fixing” the image mean?
8. What is the daguerrotype?
Video 3 - Talbot’s Process
9. Tablot and Daguerre are both considered inventors of photography. What was the main difference between their processes?
10. What three processes was Talbot specifically known for?
11. What is so significant about the calotype?
Video 4 - The Cyanotype
12.Who invented the Cyanotype?
13.What is so different about the cyanotype compared to other processes?
14.What was the cyanotype mainly used for?
Video 5 - The Collodion Negative, Ambrotype, and Tintype
15.According to the video, what was photography primarily used for when it was invented?
16.When was the collodian process invented, and by who ?
17.What was/is challenging about the wet plate collodial process.
18. How did photography change culture?
Video 6 - The Albumen Print - Most Popular Process of 19th Century
19. What is the albumen process?
20. What else about the print made it marketable?
JAN 24 CREATE A BLOG AND PUBLISH YOUR FIRST ASSIGNMENT
Part 1
1. Go to: blogger.com.
2. Click: create a blog
3. Follow the prompts and use your SCHOOL google email address.
4. Your blog title and address should be your first name and your last name each starting with a capital letter, no spaces. (ex: JohnSmith)
This means your blog address is www.JohnSmith.blogspot.com
If someone else already owns a blog with your name, then add a 1 after your name. (ex: JohnSmith1)
Let me know if you are having issues.
Part 2
1. Create your first post by clicking on New Post.
2. Title it: Elements and Principles of Design.
3. Upload your best photograph of your assigned element/principle. (You will need to download your image to the computer. You can use a variety of means like email the image to yourself and then download it from your email. Or, save your image on your google drive and access it from there. Or, if you have an SD card, I have a card reader you can borrow to upload your image from your camera to your computer.)
4. Use the handout to explain how it's a good example. The use of complete sentences, proper grammar and punctuation are expected.
5. Publish your post. (Don't just save it!)
6. Click on view blog to double check if your assignment posted. This is how I will be accessing your projects to grade them. So, make sure they are there!!!
*Note: ALL blogs must have content that is school appropriate. If it's questionable, don't do it. Make smart art.
jan 23 Elements and Principles of Design
1. In class discusion of the elements and principles of design. See PowerPoint below.
2. Pair up. You'll be assigned an element or principle. Take many photos of examples of your assigned element or principle.
3. Choose your best example photo and be ready to explain why.
2. Pair up. You'll be assigned an element or principle. Take many photos of examples of your assigned element or principle.
3. Choose your best example photo and be ready to explain why.
Jan 22 Top Photographer Season 1: Episodes 1 and 2
Take notes and turn them in before you leave.
jan 21 WELCOME TO PHOTOGRAPHY!
It's a pleasure to have you in class. Some things you need to know are below. Please, read the syllabus thoroughly and let me know if you have any questions. Also, read and sign the art contract and take it home to be signed by a parent or guardian. It is due back Friday, January 24 for 10 points.
